




Many readers have asked how to connect a Device Under Test (DUT) to a safety tester during Hipot testing. This guide starts with what a hipot tester is, then walks through the standard voltage calculation formula, step-by-step DUT connection, alternate configurations for non-exposed metal chassis, and tips for improving test accuracy.
What Is a Hipot Tester?
A hipot tester is the instrument used to run the Hipot test. It applies a high voltage to a product’s insulation and measures any leakage current that passes through. If the leakage current stays under your pass/fail limit, the product passes. If it exceeds that limit, or the insulation breaks down, the product fails.
Most hipot testers can run more than one type of test. The three most common are:
- AC Hipot test. Applies alternating voltage. This is the most widely used option because it reflects how most products actually operate.
- DC Hipot test. Applies direct voltage instead. It’s often preferred for products with high capacitance, since it avoids the charging current that AC testing can produce.
- Insulation Resistance test. Applies a lower DC voltage and measures resistance rather than leakage current. It helps catch insulation problems, like moisture or contamination, that a standard hipot test can miss.
Some testers add ground bond testing on top of these, letting you run all four tests in one sequence and verify the DUT’s ground connection at the same time.
The right hipot tester depends on what you’re testing. Simple, low-volume testing usually calls for something compact with straightforward controls. More demanding work, like multi-point testing or products that need AC, DC, and insulation resistance in one workflow, calls for a tester built for that flexibility.
Understanding the Hipot Test
The Hipot test, also known as the Dielectric Withstand Test or High-Potential Test, is a common electrical safety test mandated by international standards such as IEC 61180. Its primary purpose is to verify the insulation integrity of the DUT by subjecting it to a high voltage beyond normal operating levels for a specified period. This test also detects any weaknesses or insulation failures in the equipment. Ultimately, during this test, the DUT should not experience breakdown.
Getting to Know Your DUT
Prior to delving into the Hipot test configuration, it is crucial to have a comprehensive understanding of your Device Under Test (DUT)’s specifications, particularly its rated voltage. The rated voltage serves as a direct determinant for the testing voltage. For example, most standards recommend using a test voltage calculated as 2 times the product’s rated voltage plus 1000V.
Making DUT Connections to the Testers
To perform the Hipot test, follow these steps for connecting the DUT to the testing instrument using two test leads: the high-voltage lead and the return lead:
- Insert the black ground return lead into the “Return” terminal.
- Plug the high voltage lead into the “H.V.” (High Voltage) terminal.
- Attach the clip end of the high voltage lead to the current-carrying conductors of the DUT’s circuitry (shorted line and neutral prong).
- Connect the clip end of the ground return lead to the exposed or dead metal chassis of the DUT.
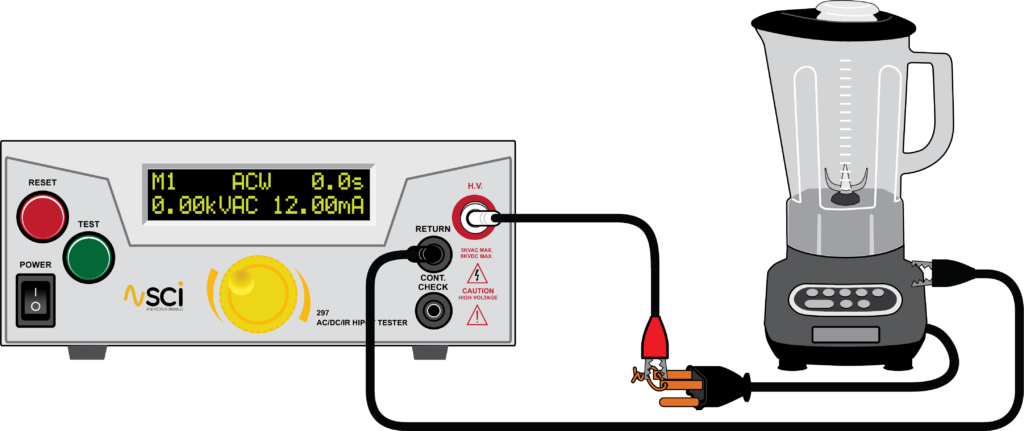
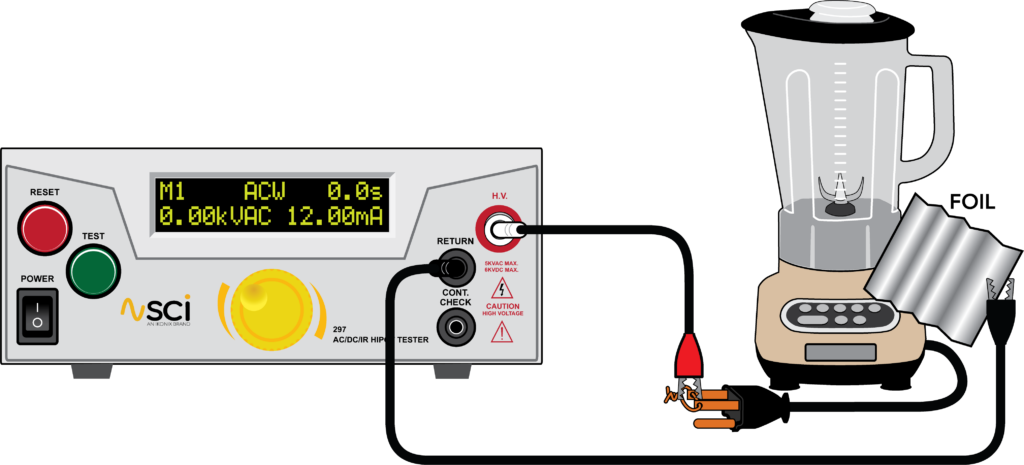
The above configuration is suitable for testing DUTs with an exposed metal chassis. If your chassis lacks any exposed metal, you can wrap the DUT’s enclosure in foil and then connect the return lead to the foil. The diagram below shows how to connect the tester to the non-exposed metal chassis DUT.
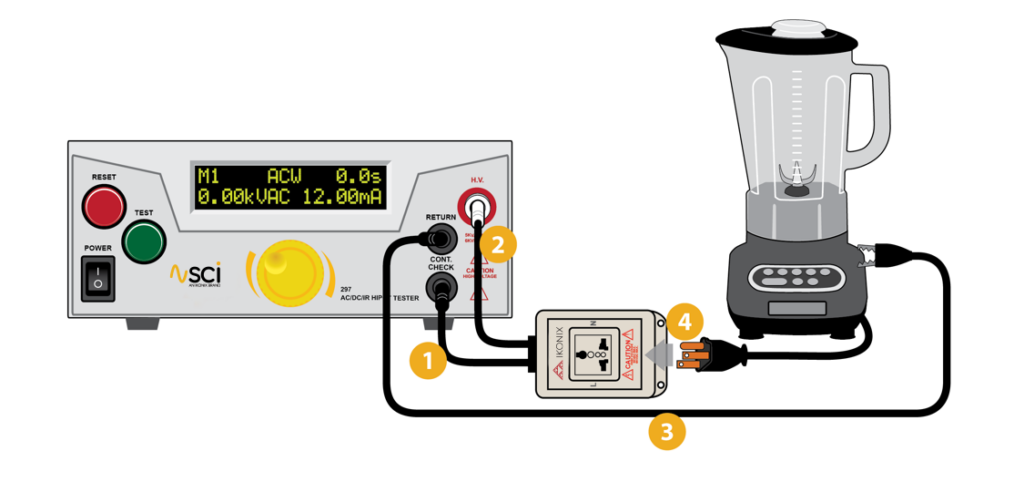
For added convenience, you can use an adaptor box to simplify the test setup. The diagram below shows how to connect the adapter box to the SCI 290 Hipot tester and the DUT.
Additional Tips for Precise Hipot Test Setup
- Proper Accessory Selection: High-quality, compatible accessories — test leads, adapter boxes — are crucial for accurate results and operator safety. Improper or unapproved accessories can pose serious hazards, jeopardizing operator wellbeing and potentially damaging the tester or equipment. Learn more about accessories.
- The Power of Calibration: Regular calibration ensures your tester delivers precise measurements by comparing readings to a known standard, identifying deviations, and making necessary adjustments.
- Prioritize Electrical Safety: Equip the right safety tester, follow safety standards, and wear the necessary personal protective equipment (PPE) to protect yourself and your team.
- Choose the Right Tester: Hipot test setup complexity varies by application. For a compact, easy-to-use option, the SCI 290 Series Hipot Tester offers simple, intuitive knob operation for quick parameter setup. For more complex testing methods, Associated Research’s HypotULTRA® and Hypot® models feature a user-friendly touch panel for straightforward operation and high productivity. HypotMax® offers ultra-high output voltage up to 20kV for special testing needs.
- Application Consulting: If you or your team are new to Hipot testing or facing specific challenges, application consulting services offer guidance on test theory and procedures, plus hands-on training.
This guide covers the most commonly required hipot test setup configuration under electrical safety testing standards. Certain standards demand more intricate setups — for questions or assistance, contact our sales representative.
FAQ
What is a hipot tester?
A hipot tester is an instrument that applies high voltage to a product’s insulation and measures the leakage current. It’s used to confirm the insulation can safely withstand voltage beyond the product’s normal operating level, and most models can also run DC hipot, insulation resistance, or ground bond tests.
What is the correct hipot test setup for a DUT with an exposed metal chassis?
Connect the high-voltage lead to the DUT’s current-carrying conductors and the return lead to the exposed or dead metal chassis, following the standard two-lead configuration.
How do I calculate the test voltage for hipot test setup?
Most standards recommend a test voltage calculated as 2 times the product’s rated voltage, plus 1000V.
What if my DUT doesn’t have an exposed metal chassis?
Wrap the DUT’s enclosure in foil and connect the return lead to the foil, creating an effective ground return point for testing.
Why does calibration matter for hipot test setup accuracy?
Regular calibration compares your tester’s readings to a known standard, identifying and correcting deviations to ensure precise, reliable test results.

